Tutorial - How to use a Pre-trained OpenVINO model on DepthAI
In this tutorial, you’ll learn how to detect faces in realtime, even on a low-powered Raspberry Pi. I’ll introduce you to the OpenVINO model zoo and running models from this ‘zoo’.
Haven’t heard of OpenVINO or the Open Model Zoo? I’ll start with a quick introduction of why we need these tools.
What is OpenVINO?
Under-the-hood, DepthAI uses the Intel MyriadX chip to perform high-speed model inference. However, you can’t just dump your neural net into the chip and get high-performance for free. That’s where OpenVINO comes in. OpenVINO is a free toolkit that converts a deep learning model into a format that runs on Intel Hardware. Once the model is converted, it’s common to see Frames Per Second (FPS) improve by 25x or more. Are a couple of small steps worth a 25x FPS increase? Often, the answer is yes!
What is the Open Model Zoo?
The Open Model Zoo is a library of freely-available pre-trained models. Side note: in machine learning/AI the name for a collection of pre-trained models is called a ‘model zoo’. The Zoo also contains scripts for downloading those models into a compile-ready format to run on DepthAI.
DepthAI is able to run many of the object detection models in the Zoo, and several are pre-included in the DepthAI Github. repository. We will be using one such model in this tutorial, is face-detection-retail-0004 (pre-compiled here on our Github, and here on the OpenVINO model zoo).
We’ll cover converting OpenVINO models to run on DepthAI in a later article. For now, you can find the models we’ve pre-converted here and brief instructions on how to do so here.
Dependencies
error
Using the RPi Compute Edition or a pre-flashed DepthAI Raspberry Pi µSD card? Skip this step.
All dependencies are installed and the repository is checked out to ~/Desktop/depthai-python-extras.
This tutorial has the same dependencies as the Hello World Tutorial - that the DepthAI API has been installed and is accessible on the system. See here if you have not yet installed the API.
Run DepthAI Default Model
The depthai.py file can be modified directly to you do your bidding, or you can simply pass arguments to it for which models you want to run.
For simplicity we will do the latter, simply passing arguments so that DepthAI runs the face-detection-retail-0004 instead of the model run by default.
Before switching to using the face-detection-retail-0004 let’s take a baby step and give these command line options a spin. In this case we’ll just pass in the same neural network that default runs when running python3 test.py, just to make sure we’re doing it right:
python3 test.py -dd
This will then run the a typical demo MobileNetv1 SSD object detector trained on the PASCAL 2007 VOC classes, which are:
- Person: person
- Animal: bird, cat, cow, dog, horse, sheep
- Vehicle: aeroplane, bicycle, boat, bus, car, motorbike, train
- Indoor: bottle, chair, dining table, potted plant, sofa, tv/monitor
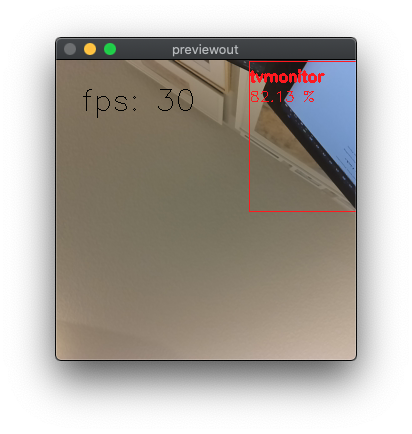
I ran this on my iMac (OS X setup here) with a microAI sitting on my desk pointing upwards randomly - and it makes out the corner of my iMac (which is barely visible) and correctly identifies it as tv/monitor:
Run face-detection-retail-0004
Now that we’ve got this verified, let’s move on to trying out other models, starting with face-detection-retail-0004.
To use this model, simply specify the name of the model to be run with the -cnn flag, as below:
python3 test.py -dd -cnn face-detection-retail-0004
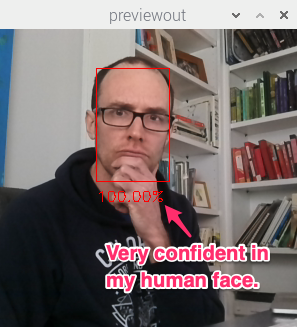
Execute the script to see an annotated video stream of face detections:
It’s that easy. Substitute your face for mine, of course.
And if you’d like to try other models, just peruse here and run them by their name, just like above.
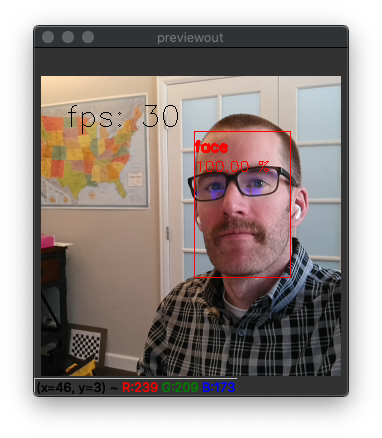
Now take some time to play around with the model. You can for example check how far away the model can detect your face:
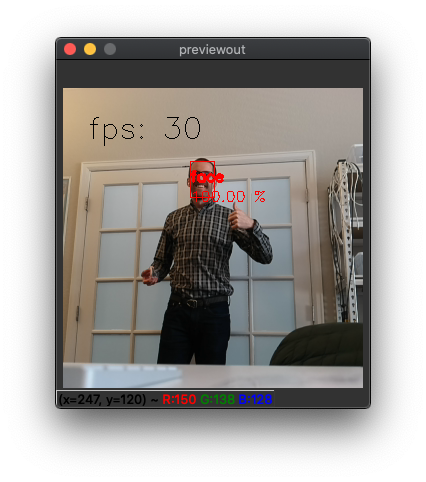
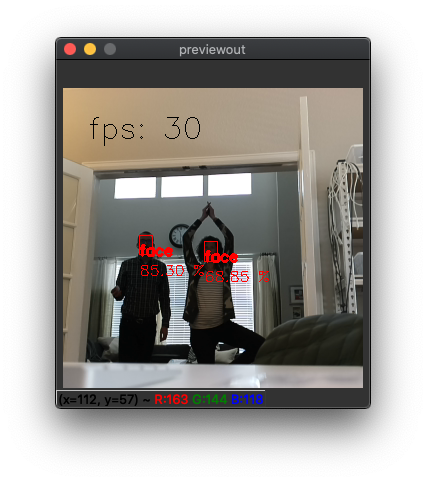
In the latter image you can see that I’m quite back-lit, which is one of the main challenges in face detection (and other feature detection). In this case, it’s likely limiting the maximum range for which a face can be detected. From the testing above, for a confidence threshold of 50%, this range appears to be about 20 feet. You could get longer range out of the same model by reducing the model confidence threshold (by changing from 0.5 here) at the cost of increased probability of false positives.
Another limiting factor is that this is a relatively low-resolution model (300x300 pixels), so faces get fairly small fairly fast at a distance. So let’s try another face detection model that uses a higher resolution.
Trying Other Models
The flow we walked through works for other pre-trained object detection models in our repository (here), which includes:
- face detection for retail (
face-detection-retail-0004) - face detection for driver assistance (
face-detection-adas-0001) - facial landmarks, simple (
landmarks-regression-retail-0009) - facial landmarksand, advanced (
facial-landmarks-35-adas-0002) - age recognition (
age-gender-recognition-retail-0013) - emotions recognition (
emotions-recognition-retail-0003) - pedestrian detection for driver-assistance (
pedestrian-detection-adas-0002) - pedestrian detection for retail environments (
person-detection-retail-0013) - vehicle detection for driver-assistance (
vehicle-detection-adas-0002) - behicle and license plate detection (
vehicle-license-plate-detection-barrier-0106)
Simply change the paths above to run the other models there, adding the correct labels (or funny ones, should you choose).
Let’s try out face-detection-adas-0001, which is intended for detecting faces inside the cabin of a vehicle. (ADAS stands for Advanced Driver-Assistance Systems)
python3 test.py -dd -cnn face-detection-adas-0001
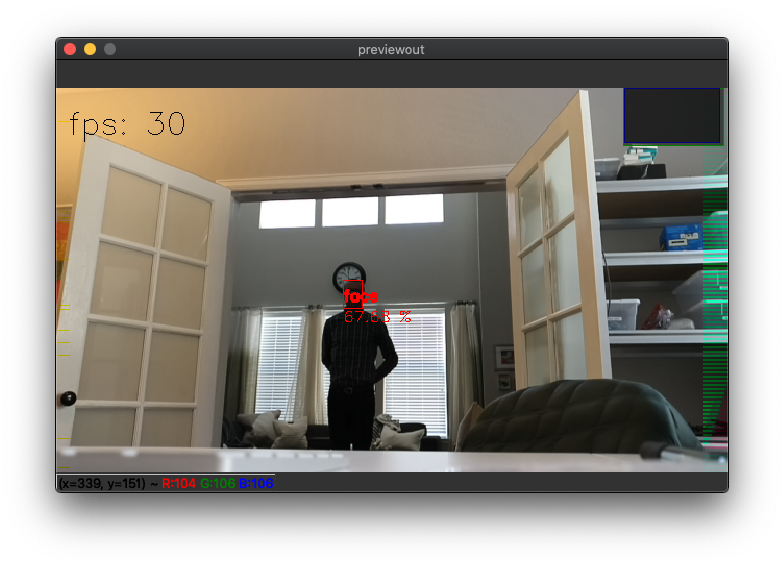
So this model actually has a shorter detection distance than the smaller model despite having a higher resolution. Why? Likely because it was intentionally trained to detect only close-in faces since it’s intended to be used in the cabin of a vehicle. (You wouldn’t want to be detecting the faces in cars passing by, for example.)
So what is this -dd option we’ve been running? Why is that there?
It’s there because we wanted to save the best for last. It stands for disable depth (and has the long-form option --disable_depth). So if you remove that, DepthAI will now calculate the 3D position of the object being detected (a face in this example, but it works for any object detector.) (And if you’re using microAI, leave it there, as microAI is monocular only - no depth information.)
So you get the full 3D position of the detected object, in this case, my face.
So that the full xyz position in meters is returned. See below.
Spatial AI - Augmenting the Model with 3D Postion
So by default DepthAI is set to return the full 3D position. So in the command above, we actually specify for it to not be calculated with -dd (or --disable_depth).
So let’s run that same command, but with that line omitted, such that 3D results are returned (and displayed):
python3 test.py -cnn face-detection-adas-0001

And there you find the 3D position of my mug!
You can than choose other models, change the labels, and you’re off - getting real-time 3D position for the class of interest.
Play with the feature and please share demos that you come up with (especially if you make a robot that stalks your cat) on discuss.luxonis.com and if you run into any issues, please ping us on our Github.
And if you find any errors in these documents, click the Edit on Github on the bottom of this page to give us the correction!
 Edit on GitHub
support@luxonis.com