Tutorial - Stereo Calibration
Learn how to (re-)calibrate DepthAI stereo disparity depth.
error
Using the RPi Compute Edition (BW1097) or USB3 Onboard Cameras Edition (BW1098OBC)? Your unit comes pre-calibrated.
For the modular camera editions of DepthAI (BW1098FFC and BW1094) it is necesssary to do a stereo camera calibration after mounting the cameras in the baseline/configuration for your application.
For the DepthAI RPi Compute Module Edition (BW1097) and USB3C Onboard Camera Edition (BW1098OBC), the units come pre-calibrated - but you may want to re-calibrate for better quality in your installation (e.g. after mounting the board to something), or if the calibration quality has started to fade over use/handling.
Below is a quick video showing the (re-) calibration of the BW1097 (DepthAI RPi Compute Module Edition).
Watching the video below will give you the steps needed to calibrate your own DepthAI. And for more information/details on calibration options, please see the steps below and also ./calibrate.py --help which will print out all of the calibration options.

Checkout the depthai GitHub repo.
error
Already installed depthai? Skip this step.
git clone https://github.com/luxonis/depthai.git
cd depthai
Print chessboard calibration image.
Either print the calibration checkerboard onto a flat surface, or display the checkerboard on a flat (not curved!) monitor. Note that if you do print the calibration target, take care to make sure it is attached to a flat surface and is flat and free of wrinkles and/or ‘waves’.
Often, using a monitor to display the calibration target is easier/faster.

The entire board should fit on a single piece of paper (scale to fit). And if displaying on a monitor, full-screen the image with a white background.
Start the calibration script.
Replace the placeholder argument values with valid entries:
python3 calibrate.py -s [SQUARE_SIZE_IN_CM] -brd [BOARD]
Argument reference:
-s SQUARE_SIZE_IN_CM,--square_size_cm SQUARE_SIZE_IN_CM: Measure the square size of the printed chessboard in centimeters.-brd BOARD,--board BOARD: BW1097, BW1098OBC - Board type from resources/boards/ (not case-sensitive). Or path to a custom .json board config. Mutually exclusive with [-fv -b -w], which allow manual specification of field of view, baseline, and camera orientation (swapped or not-swapped).
Retrieve the size of the squares from the calibration target by measuring them with a ruler or calipers and enter that number (in cm) in place of [SQUARE_SIZE_IN_CM].
For example, the arguments for the 1098OBC look like the following if the square size is 2.35 cm:
python3 calibrate.py -s 2.35 -brd bw1098obc
And note that mirroring the display when calibrating is often useful (so that the directions of motion don’t seem backwards). When seeing ourselves, we’re used to seeing ourselves backwards (because that’s what we see in a mirror), so do so, use the -ih option as below:
python3 calibrate.py -s 2.35 -brd bw1098obc -ih
So when we’re running calibration internally we almost always use the -ih option, so we’ll include it on all the following example commands:
BW1098OBC (USB3 Onboard Camera Edition)):
python3 calibrate.py -s [SQUARE_SIZE_IN_CM] -brd bw1098obc -ih
BW1097 (RPi Compute Module Edition):
python3 calibrate.py -s [SQUARE_SIZE_IN_CM] -brd bw1097 -ih
BW1098FFC (USB3 Modular Camera Edition) or BW1094 (Raspberry Pi HAT):
Use one of the board *.json files from here to define the baseline between the stereo cameras, and between the left camera and the color camera, replacing the items in brackets below.
- Swap left/right (i.e. which way are the cameras facing, set to
trueorfalse - The
BASELINEin centimeters between grayscale left/right cameras - The distance
RGBLEFTseparation between theLeftgrayscale camera and the color camera, in centimeters.
{
    "board_config":
    {
        "name": "ACME01",
        "revision": "V1.2",
        "swap_left_and_right_cameras": [true | false],
        "left_fov_deg": 71.86,
        "rgb_fov_deg": 68.7938,
        "left_to_right_distance_cm": [BASELINE],
        "left_to_rgb_distance_cm": [RGBLEFT]
    }
}
So for example if you setup your BW1098OBC with a stereo baseline of 20cm, with the color camera exactly between the two grayscale cameras, and the same orientation of the cameras as the BW1097, uses the following JSON:
{
    "board_config":
    {
        "name": "ACME01",
        "revision": "V1.2",
        "swap_left_and_right_cameras": true,
        "left_fov_deg": 71.86,
        "rgb_fov_deg": 68.7938,
        "left_to_right_distance_cm": 20,
        "left_to_rgb_distance_cm": 10
    }
}
Then, run calibration with this board name:
python3 calibrate.py -s [SQUARE_SIZE_IN_CM] -brd ACME01 -ih
Run python3 calibrate.py -h (or -h) for a full list of arguments and usage examples.
Position the chessboard and capture images.
Left and right video streams are displayed, each containing a polygon overlay.
Hold up the printed chessboard (or laptop with the image displayed on the screen) so that the whole of the checkerboard is displayed within both video streams.
Match the orientation of the overlayed polygon and press [SPACEBAR] to capture an image. The checkerboard pattern does not need to match the polygon exactly, but it is important to use the polygon as a guideline for angling and location relative to the camera. There are 13 required polygon positions.
After capturing images for all of the polygon positions, the calibration image processing step will begin. If successful, a calibration file will be created at depthai/resources/depthai.calib. This file is loaded by default via the calib_fpath variable within consts/resource_paths.py.
Test depth.
We’ll view the depth stream to ensure the cameras are calibrated correctly:
- Start a terminal session.
- Access your local copy of
depthai.cd [depthai repo] -
Run
python3 test.py -s depth_sipp.
The script launches a window, starts the cameras, and displays a depth video stream: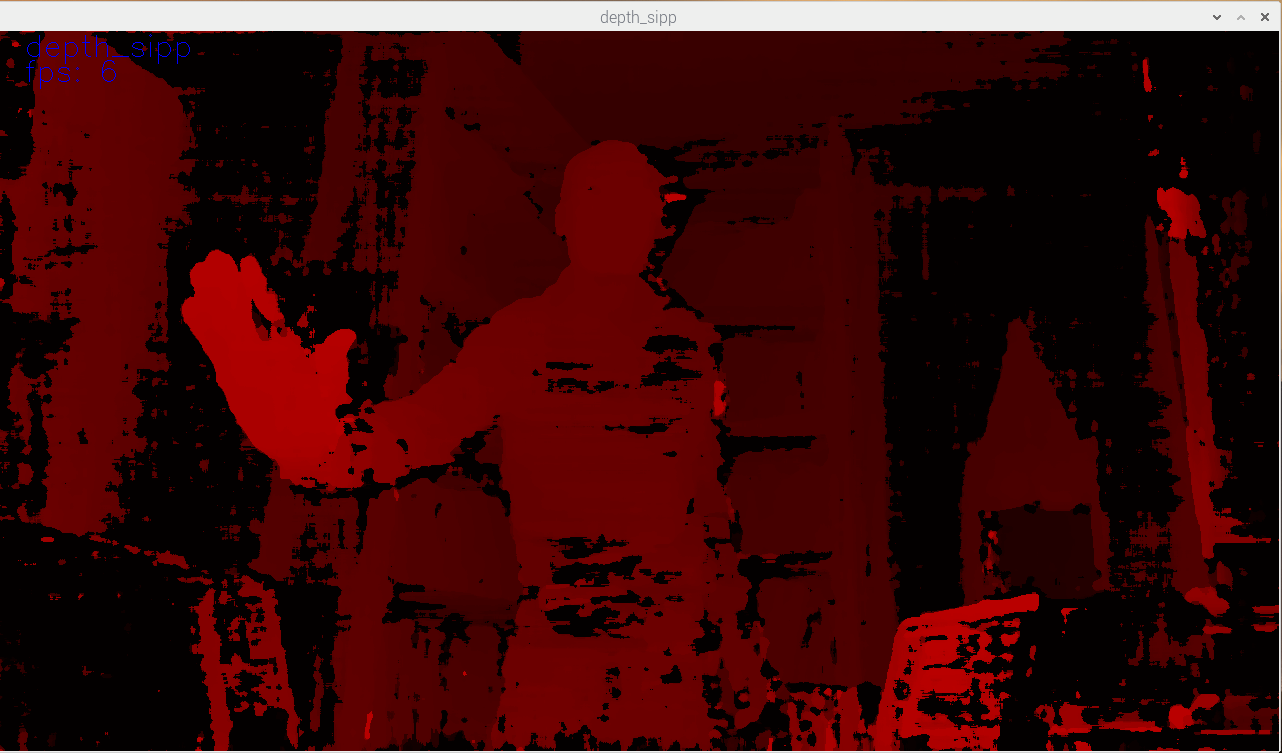
In the screenshot above, the hand is closer to the camera.
Write calibration and board parameters to on-board eeprom.
If your are happy with the depth quality above, you can write it to the on-board eeprom on DephtAI so that the calibration stick with DepthAI (all designs which have stereo-depth support have on-board eeprom for this purpose).
To write the calibration and associated board information to to EEPROM on DepthAI, use the following command:
python3 test.py -brd [BOARD] -e
Where [BOARD] is either BW1097 (Raspberry Pi Compute Module Edition), BW1098OBC (USB3 Onboard Camera Edition) or a custom board file (as in here), all case-insensitive.
So for example to write the (updated) calibration and board information to your BW1098OBC, use the following command:
python3 test.py -brd bw1098obc -e
And to verify what is written to EEPROM on your DepthAI, you can see check the output whenever running DetphAI, simply with”
python3 test.py
And look for EEPROM data: in the prints in the terminal after running the above command:
EEPROM data: valid (v2)
  Board name     : BW1098OBC
  Board rev      : R0M0E0
  HFOV L/R       : 71.86 deg
  HFOV RGB       : 68.7938 deg
  L-R   distance : 7.5 cm
  L-RGB distance : 3.75 cm
  L/R swapped    : yes
  L/R crop region: top
  Calibration homography:
    1.002324,   -0.004016,   -0.552212,
    0.001249,    0.993829,   -1.710247,
    0.000008,   -0.000010,    1.000000,
If anything looks incorrect, you can calibrate again and/or change board information and overwrite the stored eeprom information and calibration data using the -brd and -e flags as above.
 Edit on GitHub
support@luxonis.com